Shopify
Introduction
Our Shopify plug-in comes with regular updates and full integration support, offering a versatile out-of-the-box solution to accept online payments easily:
- Supports Hosted Checkout Page integration method
- Offers the following payment methods on our platform:
American Express
Diners Club
iDEAL | Wero
Maestro
MasterCard
Visa
- Accepts payment operations (Refunds, authorisations, captures etc.) directly from your Shopify Back Office.
Keep an eye on our Release Notes to stay informed about updates and new features (i.e. payment methods, features, integration methods) we have added to this plugin!
Check out our documentation to learn how to link your store with our platform to profit from all these features!
Download plugin
Shopify offers you different versions of this plugin to which they refer to as "apps". Download the plugin/app that fits your business need best:
- The installation and configuration process remains the same for each plugin version/app.
- If you choose an app supporting a specific payment method, make sure the respective payment method is active in your account.
Download standard app
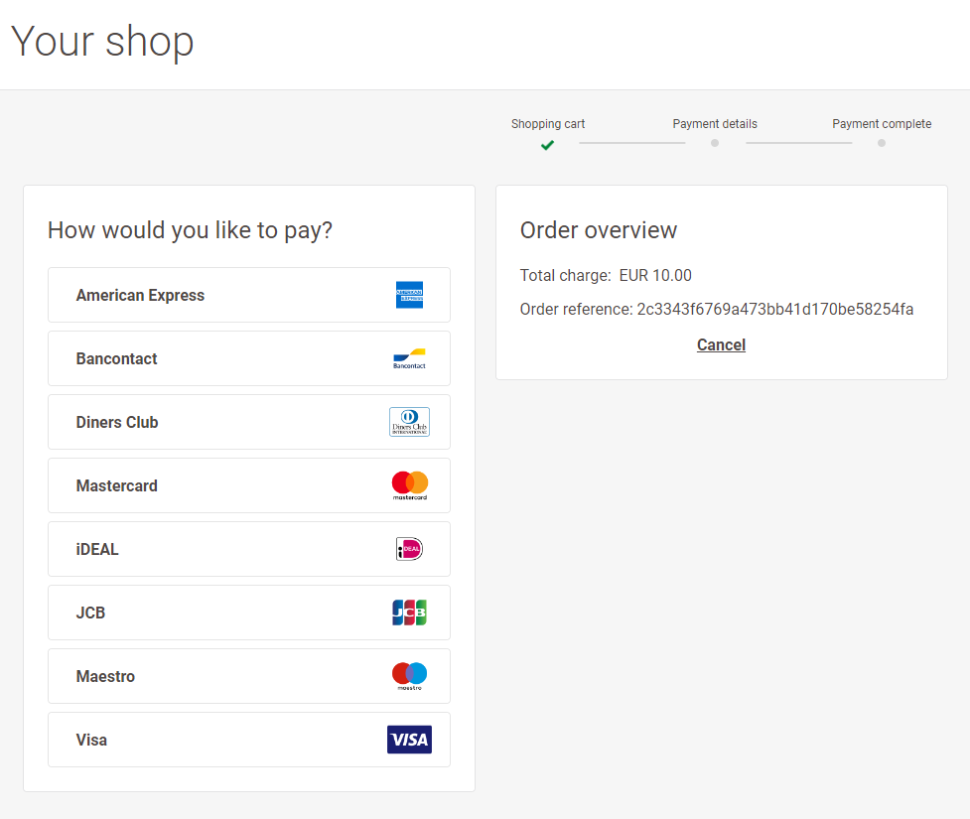
This is a convenient solution that combines all payment methods active in your account as seen in the image below. It allows your customers to select their preferred payment method on the PAYONE E-Payment payment page.
 Download standard app
Download individual payment method apps
The individual payment method apps allow your customers to preselect their preferred payment method on your Shopify check out page. The plugin then redirects them to the Hosted Checkout Page which will be branded according to the selected payment method.
We offer the following apps:
Download iDEAL | Wero app
Download SEPA Direct Debit app
Download PostFinance Pay app
Account Creation
To process transactions with this plugin, you need an account on our platform.
This plugin works with both our test and live environment. A test account is a great way to get familiar with both the plugin and our platform. Once you want to go live, create a production account or contact us!
Installation
Install plugin
The first step to use the plugin is the installation process. Before you proceed, make sure your infrastructure meets these system requirements:
| Item | Description |
|---|---|
| Plugin package | |
| PAYONE E-Payment credentials |
|
| Shopify |
No specific requirements, compatible with every store. |
| PCI compliancy |
SAQ A |
Once done, follow these steps:
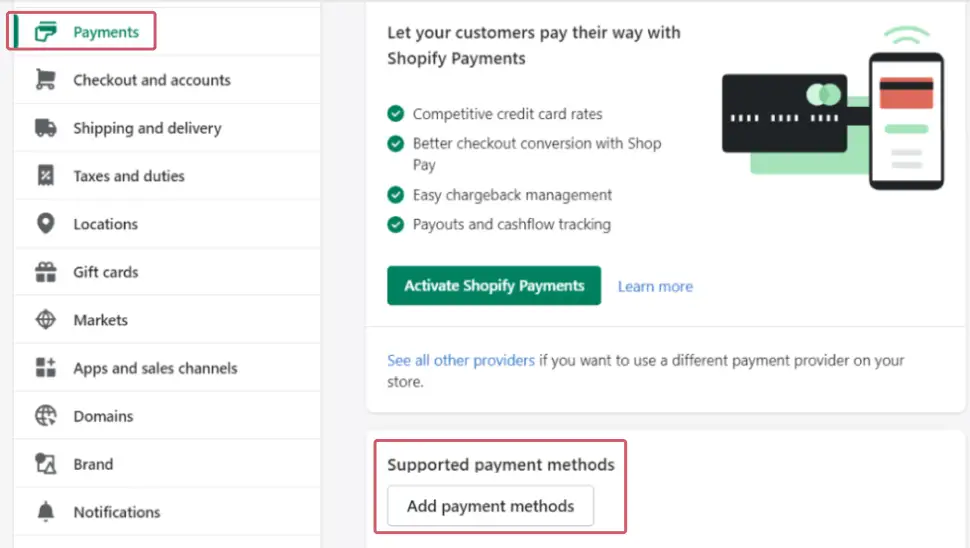
- Login to the Shopify Back Office. Go to Settings > Payments.
- Click on the "Add payment methods" button. Enter "PAYONE Online Payments" in the "Search by provider" tab in the search mask.
- Click on "Activate". In "Account status", click on "Connect" to configure the plugin.

Configuration
After the installation, you need to configure the plugin to link your store to our platform.
Configure basic settings
- Login to the Shopify Back Office. Go to Stores > PAYONE Online Payments > Login.
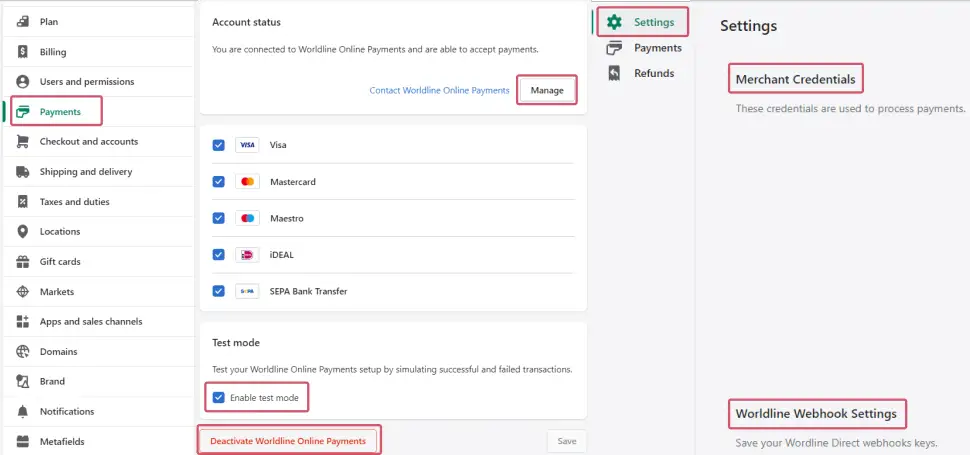
- Go to Settings > Payments. In Supported payment methods, search for the "PAYONE Online Payments" section. Click on Manage to configure the following settings:
Property Description/Actions Activate/Deactivate
PAYONE Online PaymentsClick on the "Activate/Deactivate PAYONE Online Payments” button to enable/disable the plugin.
Click on "Save” to confirm your settings.
Test mode (De-)Flag "Enable test mode" to link your shop to the respective environment. Depending on your selection, the shop module will send the transaction requests to the test or production environment.
Click on "Save" to confirm your settings.
Make sure to:
- Not mix up data from test/production and vice versa when configuring "Merchant Credentials" fields.
- Deflag "Enable test mode" as soon as you have finalised your tests.
Settings > Merchant Credentials > Account status > Manage Enter the following credentials in these fields:
- "Production/Test Merchant Id": Enter your PSPID from our platform that you want to use for transaction processing.
- "Production/Test Api Key": Enter the test/live API Key of your test or live PSPID. Read our dedicated guide to learn how to generate one.
- "Production/Test Api Secret": Enter the test/live API Secret of your test or live PSPID. Read our dedicated guide to learn how to generate one.
Webhook Settings
- "Webhooks Key": Enter the webhooks Key of your test/live PSPID from the Merchant Portal as described in our dedicated guide.
- "Webhooks Key Secret": Enter the webhooks Secret of your test/live PSPID from the Merchant Portal as described in our dedicated guide.
Webhook URL
- "Webhooks URL": Copy this URL into the Endpoint URLs fields in the Merchant Portal as described in our dedicated guide.
Payment Service Provider
- "Payment Service Provider API URL": Enter our LIVE endpoint URL payment.payone.com
- "Payment Service Provider Test API URL": Enter our TEST endpoint URL payment.preprod.payone.com
Hosted Checkout Variant
- "Hosted Checkout Variant": Enter the file name of your template to adapt our payment page to the look and feel of your shop. To learn how to create templates, see our dedicated chapter in the Hosted Checkout Page guide.
Group Cards
- "Group Cards": Activate this feature to consolidate all card payment methods under a single payment button on the Hosted Checkout Page.
Mealvouchers Product Type
- "Mealvouchers Product Type": Choose the product type for orders created using the meal voucher payment method. If no product type is required, leave it empty.
This setting applies to the entire basket. Avoid combining food products with eco products in the same basket.
Enable 3-D Secure
- "Enable 3-D Secure": This feature is mandatory in Europe. However, you can disable it for other regions. Disabling it in Europe may significantly lower your conversion rate.
Enable SCA for Every Transaction
- "Enable SCA for Every Transaction": By selecting this option, you request Strong Customer Authentication for all transactions on your website. Possible values:
3-D Secure exemption requests
- "3-D Secure exemption requests": By enabling this option, you can request your acquirer and issuer to bypass strong authentication for specific transactions. Possible values:
- "Low Value": This exemption can be applied to baskets up to 30 EUR. In cases of fraud, liability rests with you.
- "Transaction Risk Analysis": This allows card issuers to review transactions up to 100 EUR for risk. If criteria are met, an exemption from 3-D Secure can be requested, with liability for fraud resting with you.
Omit sending cart details
- By enabling this option, you will prevent our application to send basket details to the payment page, and only the total amount will be transmitted. Note that some payment methods that require basket details (like most of the "Buy now pay later") will not work anymore.
Click on "Save” to confirm your settings.

Make sure to:
- Not mix up data from test/production and vice versa when configuring "Merchant Credentials" fields.
- Deflag "Enable test mode" as soon as you have finalised your tests.
Configure payment methods
- Login to the Shopify Back Office. Go to Stores > PAYONE Online Payments > Login.
- Go to Settings > Payments. Configure the following settings:
Property Description/Actions Add payment methods When installing the plugin, all payment methods the plugin supports and that are active in your account
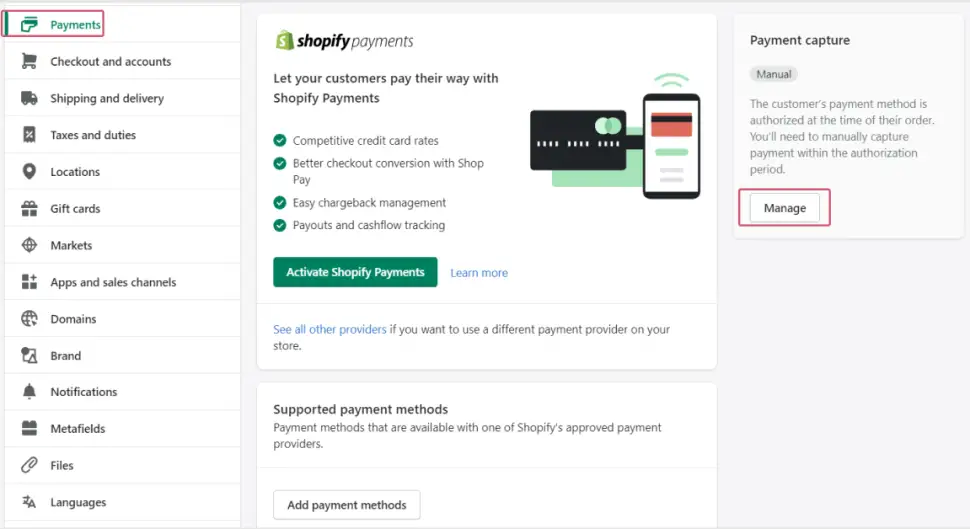
are made available automatically.Payment capture Define whether to process the transactions as authorisation mode or as direct sale by clicking on the "Payment capture" button. Select one of the following options:
- "Automatically capture payment for orders": The amount has been ordered to be paid out in one go.
Use this mode to receive the money before shipping the order There are no further actions required to capture the transaction. Successful transactions will have status="CAPTURED" /
statusOutput.statusCategory="COMPLETED" / statusOutput.statusCode=9
In the Shopify Back office, the status will be "Paid". - "Manually capture payment for orders": The amount is only blocked on your customer's card. Successful transactions will have status="PENDING_CAPTURE" / statusOutput.statusCategory="PENDING_MERCHANT" /
statusOutput.statusCode=5 (Use this mode when you wish to capture a transaction only after shipping the order).
In the Shopify Back office, the status will be "Authorized".
Click on "Save" to confirm your settings.
If "Payment capture" is set to "Manually capture payment for orders", beware of the following:
- Make sure that you capture authorised transaction later. Only then will the transaction have status="CAPTURED" / statusOutput.statusCategory="COMPLETED" / statusOutput.statusCode=9, for which you receive the actual payment for the transaction.
- Capture transaction in the Shopify Back Office via the Order module.
- "Automatically capture payment for orders": The amount has been ordered to be paid out in one go.

Manage payments
We have designed the plugin to follow-up on your orders automatically and autonomously, freeing you from the administration involved. Learn here how to use our plugin effectively which could help your business to thrive!
Perform maintenance operations
Captures, refunds and cancellations of authorisations are standard processes (maintenance operations) in your everyday business logic. Learn here how to perform these operations directly in the Shopify Back Office:
- Login to the Shopify Back Office and go to Orders. Click on the order in the table.
- In the order overview, depending on the order’s status, the following buttons are available:
Order status Available buttons statusOutput.statusCode=5 / Authorized - "Capture payment": Capture the authorised amount to receive the funds for the order.
- More actions > Cancel order: Cancel the authorised amount.
statusOutput.statusCode=9 / Paid - More actions > Cancel order: Reimburse the funds for the order.
Perform test transactions
Use our platform's test environment to make sure your plugin works as intended. We offer test data sets on our dedicated Test cases page. Target our test environment as described in the "Configure Plugin" section.
Make sure to switch to the LIVE environment as soon as you have finalised your tests.