Hosted Checkout Page
- Delegate handling sensitive data to us for PCI compliancy
- Flexible and easy visual adaptation
- Easy integration, instant payment!
Erste Schritte
Um Transaktionen auf unserer Plattform mit dieser Lösung zu verarbeiten, stellen Sie Folgendes sicher:
- Sie haben ein Konto auf unserer Plattform
- Mindestens eine dieser Zahlungsarten ist in Ihrem Konto aktiviert Kontaktieren Sie Ihren Accountmanager um dies sicherzustellen
- Sie haben Ihren API Key und API Secret in Ihrem Konto konfiguriert
- Ihr Server kann Server-zu-Server-Anfragen über unsere RESTful-API senden. Mit einem unserer Server SDKs wird diese Aufgabe erheblich erleichtert
Sind Sie bereit? Dann erfahren Sie im nächsten Kapitel, wie Sie unsere Hosted Checkout Page-Lösung einsetzen können!
How it works
Bevor Sie Live-Transaktionen verarbeiten, sollten Sie unsere Testumgebung nutzen. Lernen Sie unsere Lösung ohne Kosten oder Verpflichtungen kennen! Wenn Sie Ihre Website freischalten wollen, sehen Sie hier, wie Sie ein Livekonto erhalten oder kontaktieren Sie uns!
Ways to integrate
1Use our SDKs
Use our Server SDKs to seamlessly connect your server environment to our platform's Server API. These SDKs simplify the API's functionality with easy-to-use platform-specific objects.
2Use our plugins
Our Plugins provide a seamless link between your webshop and our platform. By effectively wrapping our RESTful API, these plugins save you time on writing code and make integration quick and easy.
Integration steps
At one point during the checkout process, you send your customers to our secure payment page. They enter their card details, we send them to your acquirer and provide you with the result.
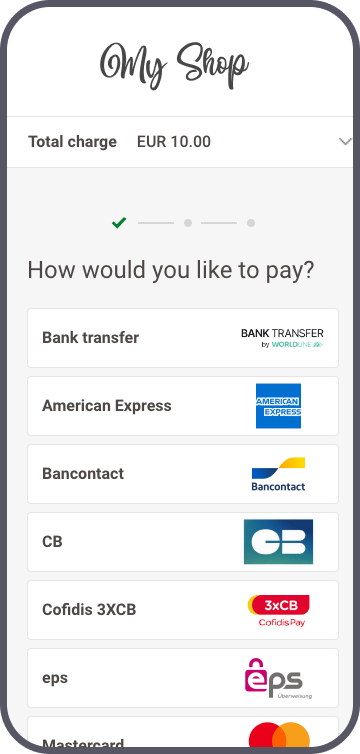
Our Hosted Checkout Page works with all payment methods available on our platform. If your customers choose a redirection payment method, we will redirect your customers directly to the third-party provider.
The following chapters cover a high-level overview of a typical flow. It describes all the steps you need to follow for processing Hosted Checkout Page transactions. Find a detailed overview including optional steps, 3-D Secure authentication etc. in the dedicated chapter.
- Initialise Server SDK
- Create Hosted Checkout session
- Redirect customer to Hosted Checkout Page
- Get transaction result & redirect customer to webshop
- Show transaction result
Initialise Server SDK
Ansteuern der Endpunkt-URLs in der Test-/Live-Umgebung
Unsere Plattform ermöglicht es Ihnen, Anfragen entweder an unsere Test- oder Live-Umgebung zu senden:
- Endpunkt-URL TEST: https://payment.preprod.payone.com/MERCHANT_ID/hostedcheckouts
- Endpunkt-URL LIVE: https://payment.payone.com/MERCHANT_ID/hostedcheckouts
Bei Verwendung unserer Server SDKs steuert Ihre Anwendung automatisch die entsprechende Umgebungs-/Integrationsmodus-URL über Objektinstanzen von CommunicatorConfiguration / IClient / CreateHostedCheckoutRequest an. Detaillierte Informationen darüber, wie Sie dies erreichen können, finden Sie im nächsten Kapitel.Dieses enthält auch vollständige Codebeispiele.
Create Hosted Checkout session
Send your customers to our secure payment page to enter the card details. To do so, you need a redirection URL to our Hosted Checkout Page. Get this URL by sending a CreateHostedCheckout request to our platform.
By default, CreateHostedCheckout session is valid for three hours. You can adapt its validity period via property hostedCheckoutSpecificInput.sessionTimeout as described in our API Reference. Make sure to execute the subsequent steps within this period.
When a session expires and its linked transaction remains in statusOutput.statusCode=0, we update the transaction status to statusOutput.statusCode=1. The status update triggers a webhook notification.
Learn more about transaction statuses in our dedicated Statuse guide.
Redirect customer to Hosted Checkout Page
Our platform sends a response in the instance of CreateHostedCheckoutResponse you created upon your request. Use the redirectUrl property to redirect your customers to our Hosted Checkout Page.
// Properties of createHostedCheckoutResponse
{
    "RETURNMAC": "12345678-90ab-cdef-1234-567890abcdef",
    "hostedCheckoutId": "123456",
    "merchantReference": "7e21badb48fe45848bbc1efef2a88504",
    "partialRedirectUrl": "preprod.payone.com/hostedcheckout/PaymentMethods/Selection/e61340e579e04172a740676ffdda162e"
    "redirectUrl": "https://payment.preprod.payone.com/hostedcheckout/PaymentMethods/Selection/e61340e579e04172a740676ffdda162e"
}
- If you are loading the partialRedirectUrl/redirectUrl inside a WebView, embedded in your mobile application, make sure to initialise the option settings.setDomStorageEnabled(true); when creating the WebView. This will avoid issues with the redirection.
- The redirectUrl is valid for three hours. Make sure to redirect your customers within this period.
- We strongly recommend not iframing the partialRedirectUrl/redirectUrl on your checkout page, as this can lead to undesired behaviour during the checkout process. If you prefer an <iframe>-based solution, our Hosted Tokenization Page is the ideal solution for you!
Get transaction result & redirect customer to webshop
Your customers enter their card details on the Hosted Checkout Page which we submit to your acquirer. We receive the transaction result and redirect your customers to your webshop. Define a hostedCheckoutSpecificInput.returnUrl in the initial CreateHostedCheckout request for this redirection. Make sure to implement a mechanism on this returnUrl that notifies your server about this redirection. Upon receiving this notification, send a GetHostedCheckoutStatus request to get the transaction result. Use the hostedCheckoutId from the initial CreateHostedCheckoutResponse:
It can happen that customers never reach your returnUrl if they close their browser after entering card details. In this case, the mechanism described above will not trigger, and your server may not send a GetHostedCheckoutStatusrequest to get the transaction result.
Use Webhooks as a fallback for event notifications independent of your customers' checkout actions. Because webhooks are asynchronous, do not use them for real-time changes to the payment journey or immediate decisions during checkout.
Show transaction result
Adapt the returnUrl depending on the statusOutput.statusCode as returned from the GetHostedCheckoutStatus request.
Learn in our dedicated Status guide more about the properties from the response, their meaning and how to proceed appropriately depending on the transactions’s status.
- By default, the hostedCheckoutId is valid for three hours during which you can send a GetHostedCheckoutStatus request. You can customise the session duration via property hostedCheckoutSpecificInput.sessionTimeout as described in our API Reference.
- After that period, you can receive the result via webhooks or request the transaction status any time via a GetPaymentDetails request.
- Mind that webhooks are asynchronous events. Therefore, they are not suitable for handling real-time events for the checkout process.
Flows
Find a full transaction flow involving every party and (optional) steps in this overview:
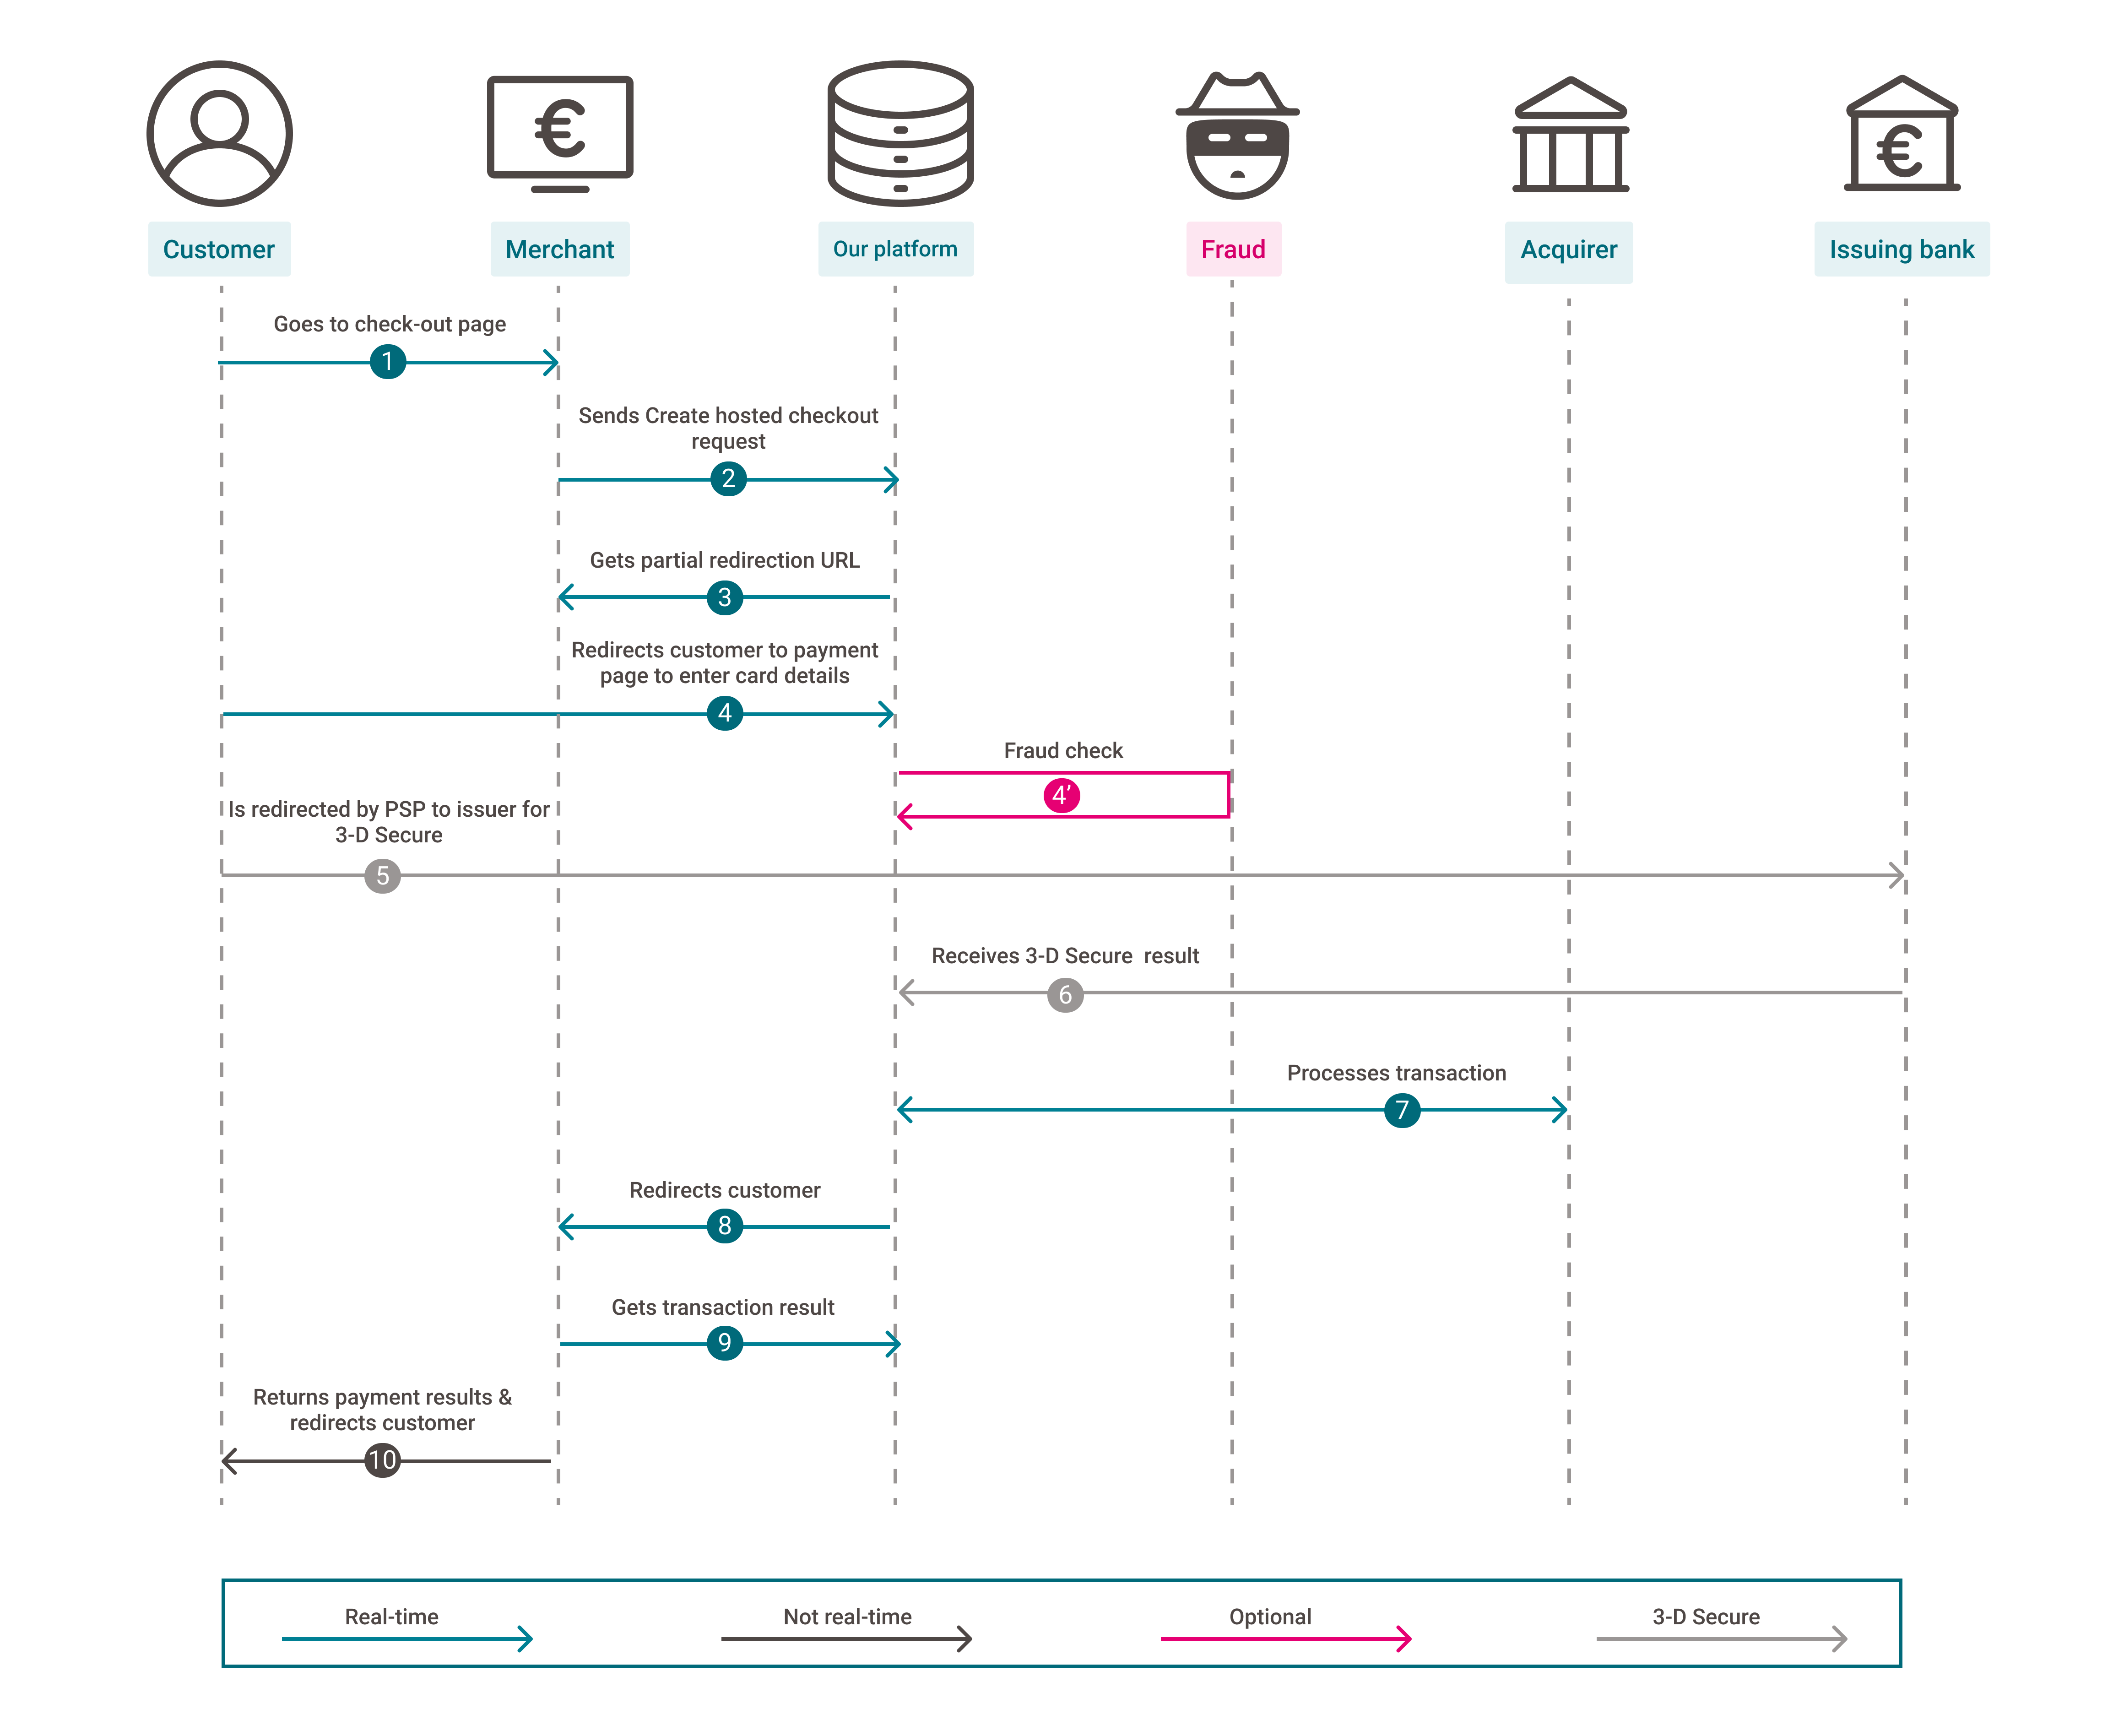
- Your customer goes to your check-out page and finalises the purchase.
- You send a CreateHostedCheckout request to our platform.
- Our platform returns a redirectionUrl.
- You redirect your customer to the redirectionUrl.
4'(optional). We perform a fraud prevention check. - We redirect the customer to her/his issuing bank for 3-D Secure authentication. The customer identifies herself/himself.
- Our platform receives the 3-D Secure authentication result from the issuer. Based on the result, two scenarios are possible:
a) If the identification was unsuccessful, we redirect your customers to your returnUrl , ending the flow. You request the transaction result as described in step 9.
b) If the identification was successful, the flow continues at step 8. - We process the transaction and receive the result from the acquirer.
- We redirect your customer to your returnUrl.
- You request the transaction result from our platform and display it on your returnUrl.
- If the transaction was successful, you can deliver the goods / service.
Unsere Hosted Checkout Page-Lösung bietet noch viel mehr Möglichkeiten. Erfahren Sie hier alles über die verfügbaren Funktionen.
Nutzen Sie ein Token für wiederkehrende Zahlungen
Direktkäufe sind eine großartige Möglichkeit, die Ihnen dabei helfen kann, die Zahlungserfahrung Ihrer Kunden zu verbessern und Ihre Konversionsrate zu erhöhen. Durch die Verwendung eines vorhandenen Tokens können Sie die Hosted Checkout Page für Ihre Kunden vorab ausfüllen:
Anpassen des Erscheinungsbilds der Zahlungsseite
Unsere Plattform ermöglicht es Ihnen, das Erscheinungsbild unserer Hosted Checkout Page zu einem großen Teil anzupassen. Das Anpassen der Zahlungsseite an Ihren Unternehmensauftritt regt Ihre Kunden zum Abschluss Ihrer Bestellung an, nachdem Sie sie auf die Hosted Checkout Page weitergeleitet haben.
- Unsere Hosted Checkout Page ist in verschiedenen Sprachen verfügbar. Weisen Sie Locale einen entsprechenden Wert zu, um die von Ihren Kunden bevorzugte Sprache anzuzeigen. Der Wert ist eine Kombination aus ISO 639-1- (Sprache) und ISO 3166-1-Code (Land):
createHostedCheckoutRequest.HostedCheckoutSpecificInput.locale = "en_EN";
Wir unterstützen die folgenden Sprachen:
Arabisch
Chinesisch
Dänisch
Deutsch
Englisch
Finnisch
Flämisch
Französisch
Griechisch
HebräischItalienisch
Japanisch
Katalanisch
Koreanisch
Lituauisch
Niederländisch
Norwegisch
Polnisch
Portugiesisch
RumänischPortuguese
Romanian
Russian
Simplified Chinese
Slovak
Slovenian
Spanish
Swedish
Turkish - Die Hosted Checkout Page lässt sich mit unserem Template Builder an Ihren Unternehmensauftritt anpassen. Es ist ein leistungsstarkes Tool mit unzähligen Möglichkeiten zum Optimieren der Zahlungserfahrung Ihrer Kunden. Steigern Sie Ihre Konversionsrate durch Anpassung unserer Tipps und Tricks.
Sobald Sie Ihre Vorlage(n) in Ihr Konto hochgeladen haben, sollten Sie Variant in Ihrer Anfrage den Dateinamen der Vorlage als Wert zuweisen:
createHostedCheckoutRequest.HostedCheckoutSpecificInput.Variant = "YourTemplate.html";
Customise template
We provide two distinct approaches for implementing a customised template:
Method 1: Create a customised template and upload it in your account
Create a fully customised template from scratch using our powerful Template Builder. Alternatively, you can download and customise the necessary files directly from our GitHub repository. This approach offers a high degree of customisation but requires some technical skills to implement effectively.
Once you have created a template that matches your webshop's look and feel, contact us to upload the template to your account.
Method 2: Customise the Template in the Merchant Portal
While it offers lower flexibility compared to method 1, it does not require any technical skills. Refer to the dedicated chapter in our Merchant Portal guide to learn how to personalise your customers' payment experience with ease.
Verfügbare Zahlungsmethoden vorauswählen
Um Ihre Kunden zum Abschluss ihrer Bestellung anzuregen, ist das Reduzieren der Zahlungsschritte wichtig. HostedCheckOutSpecificInput enthält Eigenschaften, mit denen Sie
- Den Zahlungsauswahlbildschirm überspringen und Ihre Kunden direkt zum Zahlungsformular für eine bestimmte Zahlungsart weiterleiten können. Dies gilt auch für Weiterleitungen zu einer dritten Partei (z. B. Paypal).
Alle unsere Zahlungsarten haben eine individuelle „Payment product id“. Diese finden Sie auf dem "Überblick"-Tab der jeweiligen Zahlungsmethode
Dieses Codebeispiel leitet Ihre Kunden direkt zum PayPal-Portal weiter, nachdem sie zur redirectURL/PartialRedirectUrl geleitet wurden:
- Erfahren Sie mehr über diese Eigenschaften und ihren akzeptierten Wertebereich in unserer API
- Stellen Sie Sicher, dass die Bezahlmethode, die Sie benutzen wollen, in Ihrem Test-/Livekonto aktiv ist. Kontaktieren Sie unsern Support um dies sicherzustellen
Zahlungsgruppen/Produkte auf dem Auswahlbildschirm für die Zahlungsart einschließen/ausschließen können. Verwenden Sie entweder eine Auswahl von "Payment Product Ids" oder vordefinierte Gruppen:
Kreditkarten zu einer Gruppe zusammenfassen
Mithilfe der Eigenschaft hostedCheckoutSpecificInput.cardPaymentMethodSpecificInput.groupCards=true lassen sich alle Kreditkarten-Zahlungsarten in einer Gruppe “Karten” auf der Hosted Checkout Page zusammenfassen.
Die Gruppierung kann zum übersichtlicheren Gestalten des Zahlungsauswahlbildschirms praktisch sein.
Alle Ihrer aktiven Kartenzahlungsarten in Ihrem Konto sind in dieser Gruppe enthalten. Sobald Ihre Kunden die Option “Karten” auswählen, leiten wir sie auf die Zahlungsmaske zur Eingabe der Kartennummer weiter
Unsere Plattform erkennt das Kartensystem automatisch, sobald Ihre Kunden beginnen, die Nummer einzugeben. Dies gilt auch für co-badged-Karten (wo dies relevant is)
Wenn Ihre Kunden eine Nummer aus einem beliebigen Kartensystem eingeben, das nicht in Ihrem Back Office verfügbar ist, wird in der Zahlungsmaske "Card number incorrect or incompatible" angezeigt.
Daher raten wir Ihnen dringend, Ihre Kunden in Ihrer Webshop-Umgebung über alle verfügbaren Kartenzahlungsarten zu informieren, bevor Sie Ihre Kunden auf die Hosted Checkout Page weiterleiten.
Control number of payment attempts
Property hostedCheckoutSpecificInput.allowedNumberOfPaymentAttempts allows you to limit the number of retry attempts to pay for your customers’ orders.
This will help
- Mitigating fraud (as fraudsters will try different card numbers and/or payment methods).
- Reducing your transaction costs (as PAYONE E-Payment and/or your acquirer might charge you for each retry, depending on your contract).
- Optimising your customers' payment journey, as they can try for another payment method instead of restarting the checkout process.
To do so, add this property to a standard CreateHostedCheckout request with a value between 1 and 10. After every unsuccessful payment attempt (i.e. because of a declined authorisation or a failed 3-D Secure check), we redirect your customers to our intermediate status page. If there are still retries left, it will display a "Retry" button, allowing the customers to try another card and/or payment method (depending on your pre-selection of available payment methods). If the last retry is unsuccessful, our intermediate status page will say "You have reached the maximum number of attempts". Our platform will then redirect your customers to your returnURL.
- If you leave out
allowedNumberOfPaymentAttemptsin your request, our platform grants 10 retries. - Find detailed information about this property in our API Reference.
Accessibility statement
PAYONE is committed to making its products accessible in accordance with EU directive 2019/882 from the 17th of April 2019 Article 47 of French Law No. 2005-102 of February 11, 2005.
Read our complete accessibility statement for the Hosted Checkout Page solution to learn about the product's compliance scope.