Apple Pay
Intro
Apple Pay is Apple's mobile payment method.
Once customers add their debit/credit card, payment and shipping information to their digital Apple Pay wallet, they can purchase services and goods via iOS & Web apps. The wallet's tokenisation mechanism and the implementation of Face ID/Touch ID guarantee a safe and swift payment flow.
Our platform offers both an iOS SDK and payment data decryption mechanism, allowing you to easily add Apple Pay to your mobile app.
Our platform supports the following brands:
Apple Pay - Visa
Apple Pay - MasterCard
Apple Pay - American Express
Wichtigste Vorteile
- Potential higher conversion rates for in-app payments.
- Frictionless payment experience
- Low PCI requirements (no sensitive or personal data shared) thanks to tokenization and Device PAN (DPAN) technology
- Allows any standard maintenance operation depending on your acquirer
- Huge potential in terms of usage due to global distribution of iOS devices and third-party browser support.
Zahlungserfahrung
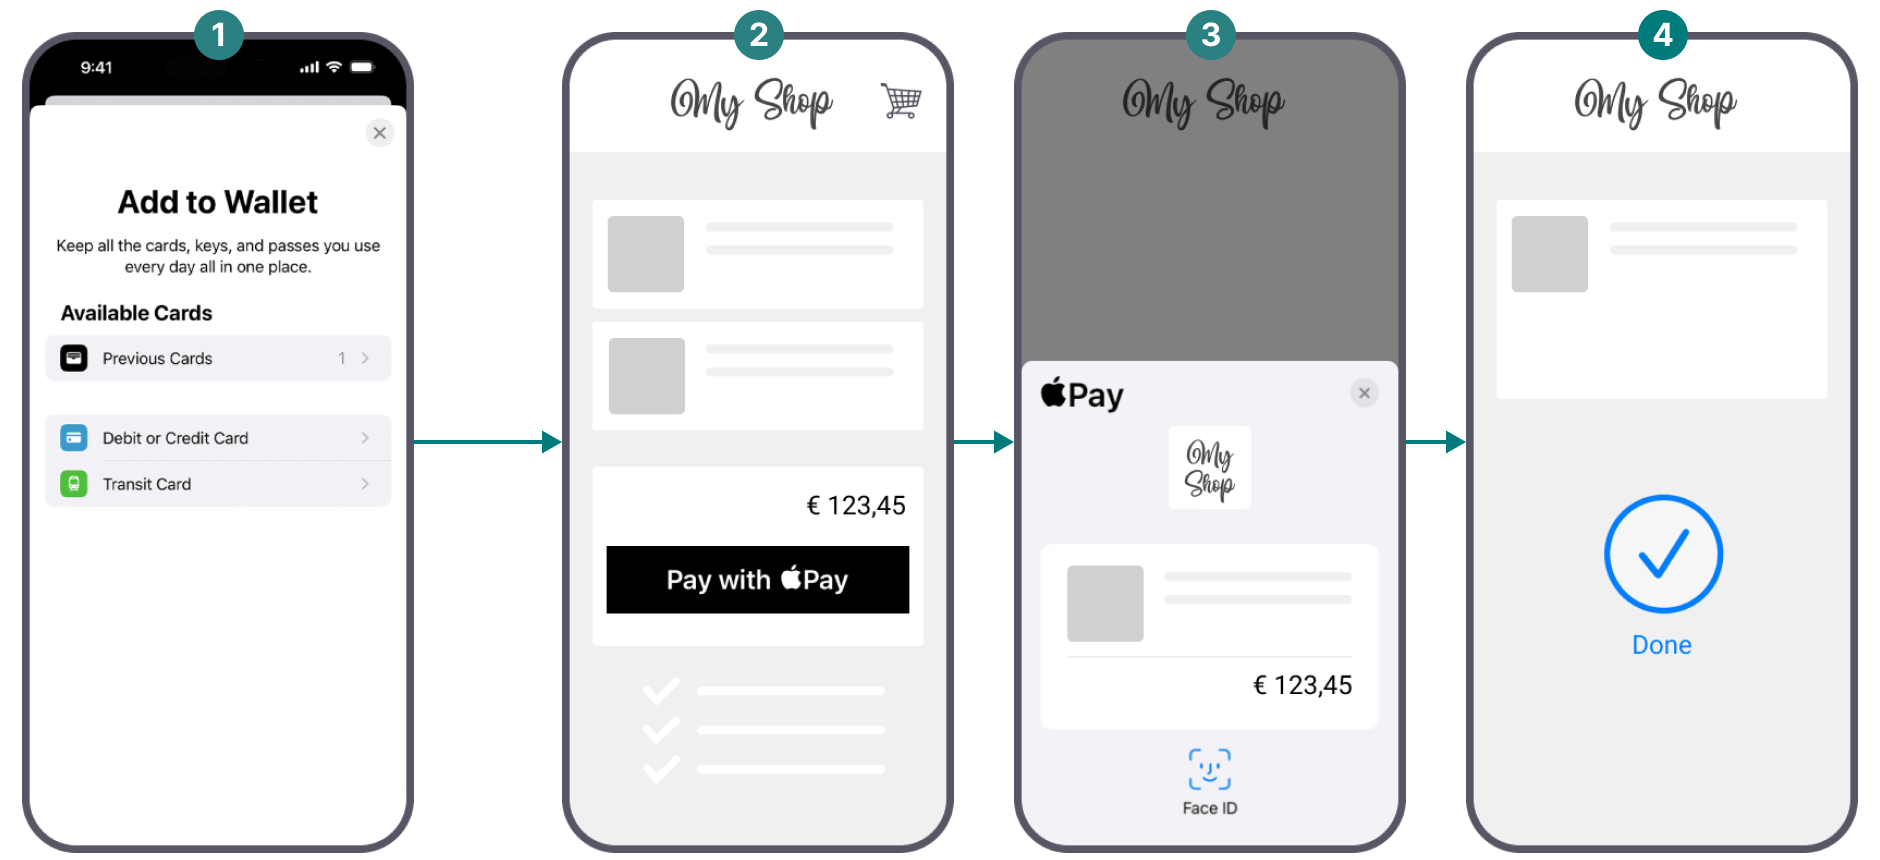
-
In supported countries, your customers can add cards to Apple Wallet on their device. They can store payment details, and their shipping and billing addresses in the app.
-
In an app that supports Apple Pay, the Buy with Apple Pay button appears when the customer is ready to check out.
-
Your customers can view and change their card details. The total amount appears. They confirm the payment with Face ID or Touch ID.
-
After confirmation, the payment follows the standard purchase flow. We process the transaction.
Einstieg
- Sign a contract with one of the supported acquirers. We will be happy to help you during the onboarding process.
- Activate Apple Pay in the Merchant Portal via Business > Payment methods.
- Depending on the integration method, further requirements apply. Refer to the “Integration” chapter for detailed information.
Länder & Währungen
Unterstützte Länder
-
 Albanien
-
 Andorra
-
 Argentinien
-
 Australien
-
 Osterreich
-
 Aserbaidschan
-
 Bahamas
-
 Bahrain
-
 Belarus
-
 Belgien
-
 Bosnien und Herzegowina
-
 Brasilien
Unterstützte Währungen
- Albanischer Lek
- Algerischer Dinar
- Angolanischer Kwanza
- Argentinischer Peso
- Armenischer Dram
- Aruba-Florin
- Australischer Dollar
- Aserbaidschan-Manat
- Bahamas-Dollar
- Bahrain-Dinar
- Bangladesch-Taka
- Barbados-Dollar
Integration
We offer this payment method for the following integration methods. Learn in our dedicated guides about the individual differences
Find a high level overview in the "Zahlungsablauf" chapter.
Depending on the integration method, differences apply:
Hosted Checkout Page
Add the following properties to a standard CreateHostedCheckout request:
{
   "order":{
      "amountOfMoney":{
         "currencyCode":"EUR",
         "amount":1000
      }
   },
   "hostedCheckoutSpecificInput":{
      "locale":"en_GB",
      "returnUrl":"https://yourReturnUrl.com"
   },
   "mobilePaymentMethodSpecificInput":{
      "authorizationMode":"FINAL_AUTHORIZATION",
      "paymentProductId":302
   }
}| Properties | Remarks |
|---|---|
|
order.amountOfMoney |
amount: The gross amount you want to charge for this order. |
|
hostedCheckoutSpecificInput |
locale: The language version of our Hosted Checkout Page and the Apple Pay payment sheet. returnUrl: The URL we redirect your customers to after the payment has been finalised. |
|
mobilePaymentMethodSpecificInput |
authorizationMode: Set to either "FINAL_AUTHORIZATION"/"PRE_AUTHORIZATION"/"SALE" depending on whether you want to process payments in authorisation/Direct Sale mode. paymentProductId: The numeric identifier of the payment method on our platform. Find this id in the "Überblick" chapter. It instructs our platform to send your customers directly to the Apple Pay payment sheet. If omitted, our platform sends your customers to the Hosted Checkout Page instead, allowing them to choose this or any other payment method that is active in your account. |
Ausführliche Informationen über dieses Objekt und seine Eigenschaften finden Sie in unserer CreateHostedCheckoutAPI
Server-to-server (Apple Pay on the web)
This integration method requires your server to interact with both the Apple Pay JS API and our PAYONE E-Payment API. We provide code samples for each of these interactions as described in the "Zahlungsablauf" chapter.
Step 1: Merchant validation
Your server sends a merchant validation request to the Apple Pay JS API:
session.onvalidatemerchant = async (event: ApplePayJS.ApplePayValidateMerchantEvent) => {
// Call Merchant Backend to get payment product session
const response = await getPaymentProductSession();
Step 2: CreatePaymentProductSession
Add the following properties to a standard CreatePaymentProductSession request:
{
  "paymentProductSession302SpecificInput": {
    "domainName": "example.com",
    "displayName": "My Example Shop"
  }
}
Store the result on your server:
const paymentSession = await response.json();Step 3: Complete merchant validation
Pass the CreatePaymentProductSession result to the Apple Pay JS API:
session.completeMerchantValidation(JSON.parse(paymentSession.paymentProductSession302SpecificOutput.session)); Step 4: CreatePayment request
Pass the encrypted payment data in property encryptedPaymentData via a standard CreatePayment request to our PAYONE E-Payment API:
{
  "mobilePaymentMethodSpecificInput": {
    "paymentProductId": 302,
    "authorizationMode": "FINAL_AUTHORIZATION",
    "encryptedPaymentData": ApplePayPaymentToken.token.paymentData.data,
    "ephemeralKey": ApplePayPaymentToken.token.paymentData.header.ephemeralPublicKey,
    "publicKeyHash": ApplePayPaymentToken.token.paymentData.header.publicKeyHash,
  },
  "order": {
        "amountOfMoney": {
            "amount": 3000,
            "currencyCode": "EUR",
        }
  }
}| Properties | Remarks |
|---|---|
|
order.amountOfMoney |
amount: The gross amount you want to charge for this order. |
|
mobilePaymentMethodSpecificInput |
authorizationMode: Set to either "FINAL_AUTHORIZATION"/"SALE" depending on whether you want to process payments in authorisation/direct sale mode. paymentProductId: The numeric identifier of the payment method on our platform. Find this id in the "Überblick" chapter. encryptedPaymentData: The encrypted payment data. ephemeralKey: A unique key used by Apple to encrypt data. publicKeyHash: A unique identifier to get the key used by Apple to encrypt data. |
Integration für Mobilgeräte
This integration method requires your server to interact with the PassKit framework, the PAYONE E-Payment API and your app on your customers' device. We provide code samples for the interaction between your server and the PAYONE E-Payment API as described in the "Zahlungsablauf" chapter.
Mind that you need to provide your own implementation for the interaction between your server and your app/PassKit framework.
Pass the encrypted payment data in property encryptedPaymentData via a standard CreatePayment request to our PAYONE E-Payment API:
{
  "order": {
    "amountOfMoney": {
      "amount": 3000,
      "currencyCode": "EUR",
    }
  },
  "mobilePaymentMethodSpecificInput": {
    "paymentProductId": 302,
    "authorizationMode": "FINAL_AUTHORIZATION",
    "encryptedPaymentData": PKPayment.token.paymentData.data,
    "ephemeralKey": PKPayment.token.paymentData.header.ephemeralPublicKey,
    "publicKeyHash": PKPayment.token.paymentData.header.publicKeyHash,
  }
}| Properties | Remarks |
|---|---|
|
order.amountOfMoney |
amount: The gross amount you want to charge for this order. |
|
mobilePaymentMethodSpecificInput |
authorizationMode: Set to either "FINAL_AUTHORIZATION"/"PRE_AUTHORIZATION"/"SALE" depending on whether you want to process payments in authorisation/Direct Sale mode. paymentProductId: The numeric identifier of the payment method on our platform. Find this id in the "Überblick" chapter. encryptedPaymentData: The encrypted payment data. ephemeralKey: A unique key used by Apple to encrypt data. publicKeyHash: A unique identifier to get the key used by Apple to encrypt data. |
Depending on the individual request, PKPayment may contain further order information. Apply the following mapping to include them in your CreatePayment request:
| PKPayment object | order.customer property |
|---|---|
|
billingContact.emailAddress or shippingContact.emailAddress |
contactDetails |
|
billingContact.name |
personalInformation.name |
|
billingContact.postalAddress |
billingAddress |
|
order.customer.shippingAddress |
shippingAddress |
Ausführliche Informationen über dieses Objekt und seine Eigenschaften finden Sie in unserer CreatePaymentAPI
Zahlungsablauf
Depending on the integration method, differences apply:
Hosted Checkout Page
If your customers initiate the payment on a non-iOS device, they can still use Apple Pay. Provided they have another iOS device at hand, third-party browser support will modify the flow slightly as described in the dedicated chapter.
Make sure to register your Merchant ID as described in the dedicated chapter.
- Your customers finalise an order on their device in your shop and select Apple Pay.
- You send this CreateHostedCheckout request to our platform.
- You redirect your customers via the redirectUrl to our Hosted Checkout Page.
- Your customers click on the "Apple Pay" button on the Hosted Checkout Page. The Hosted Checkout Page opens the payment sheet.
- The device opens the Apple Pay app. Your customers confirm the payment in the app.
- We receive the transaction result.
- We redirect your customers to your returnURL on their device.
- You request the transaction result from our platform via GetHostedCheckout or receive the result via webhooks.
- If the transaction was successful, you can deliver the goods/services.
Server-to-server (Apple Pay on the web)
If your customers initiate the payment on a non-iOS device, they can still use Apple Pay. Provided they have another iOS device at hand, third-party browser support will modify the flow slightly as described in the dedicated chapter.
Make sure to
- Register your Merchant ID as described in the dedicated chapter.
- Register your domain for Apple Pay on the Web as described in the dedicated chapter.
- Design the Apple Pay button on your checkout page according to the Apple Pay JS API and Apple Pay on the Web documentation.
- Your customers finalise an order on their device and click on the Apple Pay button on your checkout page.
- The client device calls the begin method on the Apple Pay JS API.
- The Apple Pay JS API calls the onvalidatemerchant method when the payment sheet is shown or the QR code is scanned.
- Your server makes a CreatePaymentProductSession request to our platform, including the paymentProductSession302SpecificOutput.domainName you have registered.
- Our platform returns a paymentSession.paymentProductSession302SpecificOutput.sessionwhich is passed to your frontend.
- The session is then passed to the Apple Pay JS completeMerchantValidation method.
- The Apple Pay JS API renders the payment sheet on your checkout page.
- Your customers confirm the payment.
- The Apple Pay JS API sends calls the onpaymentauthorized method with the encrypted Apple Pay token.
- Your server sends the encrypted payment data in propertymobilePaymentMethodSpecificInput.encryptedPaymentdata via this CreatePayment request to our platform.
- Our platform decrypts the payment data and sends it to Apple Pay to process the payment and returns the transaction result.
- The result is passed back as the response from the request on step 10.
- The completePayment method on the Apple Pay JS API is called.
- If the transaction was successful, you can deliver the goods/services.
- The customer’s device displays the transaction result on your checkout page.
Integration für Mobilgeräte
Make sure to
- Create an Apple developer account.
- Upload a CSR as described in the dedicated chapter.
- Implement the PassKit framework into your integration.
- Your customers finalise an order in your app and select click on the Apple Pay button.
- Your app initiates a startPayment request from the PassKit framework.
- Your customers iOS device renders the payment sheet.
- Your customers confirm the payment.
- The PassKit triggers the paymentAuthorizationController event in your app.
- Your app sends the encrypted payment data to your server.
- Your server send the payment data in property mobilePaymentMethodSpecificInput.encryptedPaymentdata via this CreatePayment request to our platform.
- Our platform decrypts the payment data and sends it to your acquirer to process the payment and returns the transaction result.
- The result is passed back as the response from the request on step 6.
-
Your app calls the completePayment method.
- If the transaction was successful, you can deliver the goods/services.
Testdaten
In unseren Testszenarios finden Sie Testdaten und detaillierte Instruktionen.
Stellen Sie sicher, den korrekten Endpunkt anzusteuern und zurück zum Live-Endpunkt zu wechseln, sobald Sie Ihre Tests abgeschlossen haben
Zusätzliche Informationen
Register Merchant ID (Hosted Checkout Page)
For payments via the Hosted Checkout Page, you need to register your Merchant ID. To do so, follow these steps:
- Login to the Merchant Portal. Go to Business > Payment methods > How to accept payments with Apple Pay > Hosted Checkout Page.
- Read the Apple Pay terms and conditions by clicking on the respective link. Flag "I have read and accept terms & conditions" to approve them
- Click on "Activate Apple Pay". You are ready to offer Apple Pay to your customers via Hosted Checkout Page integration method.
- If you reject the Apple Pay terms & conditions, the payment method will not be available on our Hosted Checkout Page.
- Apple's terms and conditions can change. Keep yourself up to date by accessing them regularly.
Domain registration for Apple Pay on the Web
For payments via Server-to-server, you need to register your domain. To do so, follow these steps:
- Login to the Merchant Portal. Go to Business > Payment methods > How to accept payments with Apple Pay > Apple Pay on the Web > Add domain.
- Follow the instructions as stated there and click on "Save".
Apple Pay certificates (Integration für Mobilgeräte)
For payments via Integration für Mobilgeräte, you need to create Apple certificates. To do so, follow these steps:
- Login to the Merchant Portal. Go to Business > Payment methods > How to accept payments with Apple Pay > Mobile SDKs and Server-to-Server.
- Follow the instructions on the page to
a) Download the certificate signing request (CSR) on that page.
b) Create the Apple Pay certificate on the Apple developer portal using that CSR.
c) Upload the generated certificate via the "Upload certificate" button.
- Make sure to create separate certificates for our test / production environment.
- Apple allows you to create a maximum of three certificates per Merchant ID. Mind that only one certificate per Merchant ID can be active. Use the three slots to manage expiring certificates.
- Due to this limitation, we recommend using different Merchant ID for our test / production environment.
- Apple certificates expire after two years. Make sure to timely create and upload a new one. We will notify you via e-mail as soon as a certificate is about to expire.
Third-party browser support
Even if a payment has been initialised on a non-iOS device, your customers can still use Apple Pay via a second iOS device.
Our platform implements third-party browser support, detecting whether the device initialising the payment is an iOS or not. If the latter applies, the process flows is adapted as follows:
- Your customers finalise an order on their non-iOS device.
- Our platform displays a QR code on the Hosted Checkout Page.
- Your customers scan the displayed QR code with their mobile/tablet iOS device.
- The mobile/tablet iOS device opens the payment sheet. Your customers confirm the payment.
- We redirect your customers to your returnURL on their non-iOS device.
Certificate sharing
For payments via Integration für Mobilgeräte, you need to create Apple certificates. By default, certificates can be used only for single account.
However, our platform allows you to share one Apple certificate with multiple accounts. Contact us to make this happen.
Apple Pay and Card On File
Card On File (COF) allows a customer's card details to be stored for future payments, which is also possible for Apple Pay.
The COF framework defines the fair use of stored card data, giving you specific instructions. We explain these in the dedicated use cases section and provide for each JSON samples/API endpoints. Apple Pay only supports use case A and E and as differences apply, we document them here directly.
Sample A - CIT first & recurring
| CreateHostedCheckout | CreatePayment |
|---|---|
|
|
Apple Pay Recurring Payment Request
For CreatedHostedCheckout the applePayRecurringPaymentRequest object is required in paymentProduct302SpecificInput. Everything defined under the applePayRecurringPaymentRequest object is used to configure the Apple Pay payment sheet on the customer device. The information is only for visual purposes and will not be used for the payment processing.
For recurring or subsequent transactions outside the wallet flow, our platform will process the transaction as a card payment. Even if the initial transaction has been initiated from a wallet, the Merchant Portal and the PAYONE E-Payment API will register the transaction as a card payment.
Recurring with immediate start and no end date:
{
    "mobilePaymentMethodSpecificInput": {
        "paymentProduct302SpecificInput": {
            "recurring": {
                "recurringPaymentSequenceIndicator": "first"
            },
            "applePayRecurringPaymentRequest": {
                "paymentDescription": "Test subscription",
                "regularBilling": {
                    "label": "Subscription",
                    "amount": "20.00",
                    "type": "final",
                    "paymentTiming": "recurring",
                    "recurringPaymentIntervalUnit": "month",
                    "recurringPaymentIntervalCount": 1
                },
                "managementURL": "https://worldline.com"
            }
        }
    },
    "hostedCheckoutSpecificInput": {
        "isRecurring": true
    },
    "order": {
        "amountOfMoney": {
            "amount": 10,
            "currencyCode": "EUR"
        }
    }
}
Recurring with specific start date and no end date:
    {
    "mobilePaymentMethodSpecificInput": {
        "paymentProduct302SpecificInput": {
            "recurring": {
                "recurringPaymentSequenceIndicator": "first"
            },
            "applePayRecurringPaymentRequest": {
                "paymentDescription": "Test subscription",
                "regularBilling": {
                    "label": "Subscription",
                    "amount": "20.00",
                    "type": "final",
                    "paymentTiming": "recurring",
                    "recurringPaymentStartDate": "2025-01-07T00:00:00",
                    "recurringPaymentIntervalUnit": "month",
                    "recurringPaymentIntervalCount": 1
                },
                "managementURL": "https://worldline.com"
            }
        }
    },
    "hostedCheckoutSpecificInput": {
        "isRecurring": true
    },
    "order": {
        "amountOfMoney": {
            "amount": 10,
            "currencyCode": "EUR"
        }
    }
}
Recurring with specific start date and specific end date:
    {
    "mobilePaymentMethodSpecificInput": {
        "paymentProduct302SpecificInput": {
            "recurring": {
                "recurringPaymentSequenceIndicator": "first"
            },
            "applePayRecurringPaymentRequest": {
                "paymentDescription": "Test subscription",
                "regularBilling": {
                    "label": "Subscription",
                    "amount": "20.00",
                    "type": "final",
                    "paymentTiming": "recurring",
                    "recurringPaymentStartDate": "2025-01-07T00:00:00",
                    "recurringPaymentIntervalUnit": "month",
                    "recurringPaymentIntervalCount": 1,
                    "recurringPaymentEndDate": "2026-01-01T00:00:00"
                },
                "managementURL": "https://worldline.com"
            }
        }
    },
    "hostedCheckoutSpecificInput": {
        "isRecurring": true
    },
    "order": {
        "amountOfMoney": {
            "amount": 10,
            "currencyCode": "EUR"
        }
    }
}
Recurring with trial billing :
    {
    "mobilePaymentMethodSpecificInput": {
        "paymentProduct302SpecificInput": {
            "recurring": {
                "recurringPaymentSequenceIndicator": "first"
            },
            "applePayRecurringPaymentRequest": {
                "paymentDescription": "Test subscription",
                "regularBilling": {
                    "label": "Subscription",
                    "amount": "20.00",
                    "type": "final",
                    "paymentTiming": "recurring",
                    "recurringPaymentStartDate": "2025-04-07T00:00:00",
                    "recurringPaymentIntervalUnit": "month",
                    "recurringPaymentIntervalCount": 1
                },
                "trialBilling": {
                    "label": "Trial",
                    "amount": "10.00",
                    "type": "final",
                    "paymentTiming": "recurring",
                    "recurringPaymentStartDate": "2025-01-07T00:00:00",
                    "recurringPaymentIntervalUnit": "month",
                    "recurringPaymentIntervalCount": 1,
                    "recurringPaymentEndDate": "2025-04-07T00:00:00"
                },
                "managementURL": "https://worldline.com"
            }
        }
    },
    "hostedCheckoutSpecificInput": {
        "isRecurring": true
    },
    "order": {
        "amountOfMoney": {
            "amount": 10,
            "currencyCode": "EUR"
        }
    }
}
Sample E - MIT scheduled payments
{
    "subsequentcardPaymentMethodSpecificInput": {
        "subsequentType": "recurring"
      },
      "order": {
        "amountOfMoney": {
            "amount": 10,
            "currencyCode": "EUR"
        }
    }
}